

Grand Theft Auto VI arrives on Thursday 19 November, and it is coming back to Vice City — all neon pink, teal and palm trees. If you have been waiting years for this launch, the worst way to spend the first night is staring at a tangle of cables on a desk that does not fit the room.
You do not need a spare room or a big budget to be ready. You need one corner, a desk that fits it, light that makes it feel like Vice City, and a wall that looks finished. Everything in this guide is renter-friendly: no drilling, no built-ins, nothing you cannot take with you when you move. Build it in the days before launch, and launch night is about the game, not the room.
Table of Contents
[Hide]- Pick the corner first
- The desk that fits it
- Light it neon without drilling
- The wall in one evening
- Cables and comfort before launch night
- Launch-night comfort check
- FAQ
- How much space do I need for a GTA 6 gaming corner?
- Can I make a gaming corner in a rental without drilling?
- What colours work for a Vice City look?
- Is one monitor enough for GTA 6?
- How do I stop the room overheating during a long session?
Pick the corner first

Every good gaming corner starts with a tape measure, not a shopping list. Walk the room and find the corner that is actually free — not the one with the radiator, not the one the door swings into, not the one where the bed already lives.
Write down four numbers before you buy or move anything. First, the usable wall length on both sides of the corner, ignoring radiators, door swings and window sills. Second, the walkway depth — how far the desk can stick out before you clip your shin on the way to bed. Third, the chair space: you need room to sit down and slide in, and roughly 30 to 36 inches behind the chair so you can roll back without hitting furniture. Fourth, the outlet location, because a power strip under the desk beats a cable stretched across the floor every time.
Check the light too. A desk facing a bare window sounds lovely until the sun hits the screen, and a window behind you turns you into a silhouette on a call. The kindest light for a screen comes from the side. If the only free corner is on a window wall, plan to angle the desk or soften the window with sheer curtains — the same idea that works for any desk in front of a window.
A corner beside the bed, the sofa or the wardrobe is usually the answer in a rental. It keeps the gaming area connected to the rest of the room instead of taking it over, and it leaves the middle of the floor free, which is what makes a small room feel like a room.
The desk that fits it

A desk that is too big is the most common mistake in a small room. A compact desk around 100 to 120 centimetres wide and 55 to 60 centimetres deep holds a monitor, a keyboard and a mouse with room to spare. Deeper than about 70 centimetres looks generous in photos and eats the room in real life.
An L shaped desk is the natural fit for a corner, because it uses two walls at once and leaves the middle of the room open. But keep it compact: the long arm is for playing, the short arm is for storage, a console or a laptop — not for a second huge screen you have to twist toward. If the short arm is shallower than your keyboard and mousepad together, do not put your main game on that side.
One good screen beats two cramped ones in a small room. Two large monitors on a narrow desk leave no mouse space at all. If you do run two screens, put your main screen dead ahead at arm’s length, with the top of the screen at about eye level, and the second screen on the other arm of the L, angled slightly toward you. A freestanding monitor arm that clamps to the desk edge is the renter-friendly way to do it: it holds the screen steady, frees the desk underneath, and leaves no holes in the wall.
Keep the PC where it can breathe. On the floor beside the desk is fine if it is not on carpet with its intake pressed to the floor. Under the desk is fine if air can move around it. What does not work is shutting it inside a closed cabinet or wedging it into a gap beside the wardrobe — small rooms already run warm, and hot air needs somewhere to go.
Light it neon without drilling

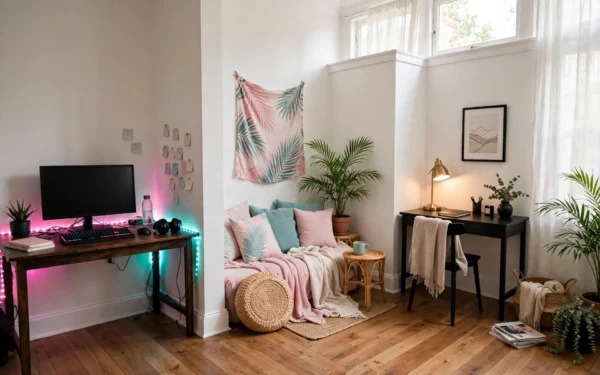
Lighting is what turns a desk into a Vice City corner. The game’s look is pink and teal neon against dark streets, and you can borrow that palette with removable LED strips: one run behind the monitor, one under the lip of the desk. They stick with removable adhesive and peel off cleanly at move-out, so the glow is the one thing in the room that needs no permission at all.
Less is more. Pick one main lighting zone and let it be the accent, instead of covering every surface in bright colour. A strip that is too bright reflects in the screen and tires your eyes, so keep the glow soft and let it wash the wall behind the desk rather than pointing at you. Then balance it with one warm desk lamp on the second arm of the desk, for everything that is not on screen — finding a controller, reading notes, or just seeing the room.
If your room has white walls, you are already ahead: warm light and warm wood do most of the work of making the corner feel finished, and the pink and teal glow reads beautifully against a pale wall. That is the same layering idea that makes the rest of a rental room feel cosy — soft light in layers, not one harsh ceiling bulb.
Avoid working in a dark room with only the monitor lit. Your eyes will thank you after a long session, and the corner will look better in every photo you take of it.
The wall in one evening

The wall behind your desk is free decorating space, and in a small room it matters more than the floor. One evening is enough to finish it, and nothing you hang needs a nail.
Start with three to five prints, not fifteen. A small set of framed game posters — the Vice City artwork, a Leonida map print, one piece of art you actually like — arranged together reads as designed, while a wall covered edge to edge reads as clutter. Hang them with removable strips or picture ledges, centre the arrangement at eye level, and leave breathing room between frames.
A map poster makes a good centrepiece if you want one: size it to the wall, frame it or clip it cleanly, and light it without glare. One neon-style sign beside it is plenty — a simple shape or a short word in pink or teal, hung from a removable hook. Then stop. A small shelf with a plant and one or two small objects finishes the wall without filling it.
Keep the colours connected to the rest of the room. If your bedding or furniture is warm wood and cream, let the posters and the light carry the pink and teal, and keep the desk and chair in the room’s own palette. When the colours connect, the gaming corner feels like part of your home instead of a station that landed in it.
Cables and comfort before launch night


Cables are what make a gaming setup look messy, and a launch-night corner has more of them than a normal desk: console or PC, two screens, a headset, a charger, lights. Sort them before you put anything on the desk, because fixing them afterwards means taking the whole corner apart.
Run cables along the back edge of the desk first, then down one leg. Clips that stick to the desk with removable adhesive hold them in place and peel off at move-out. A short cable tray or a fabric sleeve under the desk keeps the bundle together and out of sight from the front. Keep the power strip on the desk leg or under the desk top, not on the floor where a chair wheel can catch it. Use ties you can undo rather than single-use ones — you will add something later, and you will want the slack back.
Then think about sitting there for hours. The chair matters less than how you sit in it: feet flat on the floor, knees at roughly a right angle, screen at eye level. If the chair is too low, your shoulders hunch toward the screen; too high, and your feet dangle. A cushion or a small footrest fixes either one without buying new furniture. A small rug under the desk marks the corner as its own zone, cuts echo, and protects the floor from chair wheels. Keep water, headphones and the controller within arm’s reach on the second arm of the desk, so you are not twisting to grab them mid-game.
Sound is the last piece. In a small room, a good headset beats speakers on a tiny desk — speakers fight the keyboard for space, and a PC two metres from a bed is louder than you think. If you do want speakers, put them on a shelf behind you, not in your mouse lane, and keep soft furnishings in the room: a curtain, a rug, even a full bookshelf does more for echo than a single foam square stuck behind the monitor.
Launch-night comfort check

Run this check the night before launch, not ten minutes before you start playing. Lights: the neon strip glows, the warm lamp works, and no light points at the screen. Sound: headset charged, volume sensible, nothing rattling. Seating: chair rolls freely, cushion in place, footrest where your feet expect it. Cables: nothing crosses a walkway, nothing snags when the chair rolls back. Tidy: the desk holds only what launch night needs, controllers and headset have a home, and the snack tray is ready on a side table, not on the desk.
Then give the corner a five-minute reset rule for after every session: clear the desk, coil any loose cable back into its clip, put the controllers away. A gaming corner collects clutter fast, and five minutes keeps it feeling like the photos that inspired it.
The mistakes to avoid are the same ones that ruin any small setup: buying the desk before measuring the corner, putting the main screen in the corner itself where it sits too close and too far to the side, ignoring cables until everything is tangled, and copying a photo exactly — photos hide power strips, spare cables and the PC tower. Plan for the real setup first, then make it look calm.
FAQ
How much space do I need for a GTA 6 gaming corner?
One free corner is enough. Measure both walls, leave roughly 30 to 36 inches behind the chair, and keep the walkway clear. A compact desk around 100 to 120 centimetres wide fits a monitor, keyboard and mouse without taking over the room.
Can I make a gaming corner in a rental without drilling?
Yes. Use a freestanding desk, a clamp-on monitor arm, removable adhesive strips for LED lighting and posters, and cable clips that peel off. Nothing in this guide needs a hole in the wall.
What colours work for a Vice City look?
Pink and teal neon against a pale or warm-neutral room. Let the light and the posters carry the bright colours, and keep the desk, chair and textiles in the room’s own palette so the corner still feels like home.
Is one monitor enough for GTA 6?
For most small rooms, yes. One well-placed screen with proper viewing distance plays better than two cramped ones. Add a second screen only if the desk has real mouse space left over.
How do I stop the room overheating during a long session?
Give the console or PC space to breathe, don’t shut it in a cabinet, and let air move across the room — a window cracked open or a fan moving air across the room, not blowing straight into the machine.



One Thought on “Build Your GTA 6 Corner Before Launch Day”